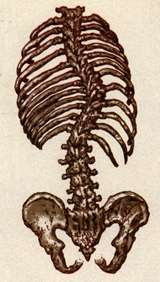
Figure 1 Scoliosis is characterized by a lateral curvature of the spine, and rotation of the affected vertebrae toward the side of the concavity. The ribs are compressed on the side of concavity and spread apart on the convex side.
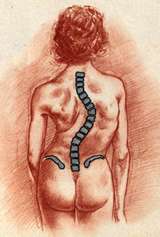
Figure 2 In a right thoracic scoliosis, the major scoliosis is concentrated in the thoracic (mid back) region and the spine curves to the right.
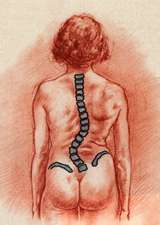
Figure 3 In a left lumbar scoliosis, the major curve is to the left and is concentrated in the lumbar (lower back) region.
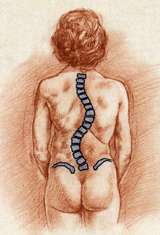
Figure 4 In a right thoraco-lumbar scoliosis, the major curve is to the right in the thoracic lumbar region.
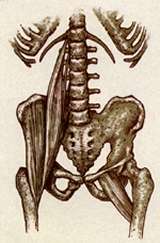
Figure 6 Psoas (Major and Minor)

Figure 7
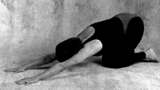
Figure 8
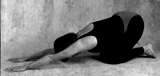
Figure 9
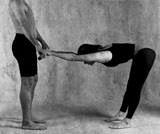
Figure 10
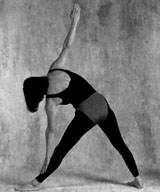
Figure 11(Incorrect)
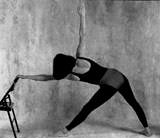
Figure 12
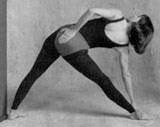
Figure 13
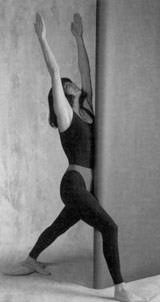
Figure 14
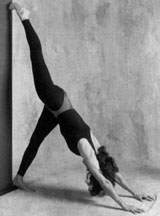
Figure 15
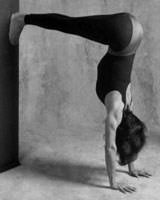
Figure 16
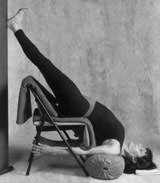
Figure 17
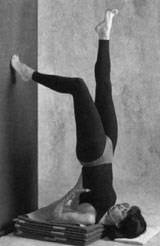
Figure 18
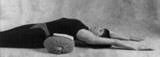
Figure 19
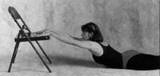
Figure 20
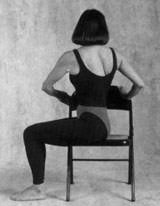
Figure 21
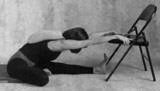
Figure 22
From an article, Yoga for Scoliosis, by Elise Browning Miller which originally appeared in The Yoga Journal, May/June 1990, revised November 1999.
Yoga for Scoliosis
By ELISE BROWNING MILLER
Illustrations by Alexander Laurant. Photographs by Fred Stimson
WITH REGULAR PRACTICE, YOU CAN EASE THE PAIN OF A CROOKED BACK AND TURN IT INTO A POWERFUL TEACHER.
The dull aching on the right side of my mid-back was familiar. Sitting at my desk all day working on income taxes was not only dulling my mind, it was creating a pain in my body that I could no longer ignore. So I got up and headed for the kitchen. Stuffing my face was always a quick solution for the pains and problems of life.
As I grabbed for the food, it occurred to me, “Not only am I in pain, I’m downright depressed! “Though I knew taxes were not always an enlightening task, I hadn’t realized that my whole psyche was besieged by negativity. Was my negative attitude affecting my already vulnerable back or was it the other way around? Either way, eating was not going to solve the problem.
I knew of only one solution for my spasmed back and negative attitude. For years, only yoga had helped me cope with the pain I had lived with almost all my life. At 16 months, I had fallen down a steep flight of basement stairs. Initially, the family physician thought I had only broken my nose. Years later, I found out that my ribs had been knocked out of position from the accident, which gradually created a lateral curvature of the spine called a scoliosis.
WHAT IS SCOLIOSlS?
Perhaps the most dramatic of spinal aberrations, scoliosis appears in cave paintings of prehistoric man and was first treated with braces by the Creek physician Hippocrates in the fourth century B.C, Not only does it create spinal deformity and rib displacement, it twists the shoulders and hips and shifts the body’s center of gravity. Its most obvious symptoms are cosmetic, but pain and cardiopulmonary complications (due to compression of the heart and lungs) are also common. The word “scoliosis” is derived from the Greek word skol, which means twists and turns. In scoliosis, the spine forms an S curve (or reversed S) from side to side down the back, and at the same time the back of the spine rotates toward the concave side of the S, twisting the rib cage and making the sides of the back uneven. (To observe this effect, bend a hose into an S shape and observe how it rotates at the same time.) Particularly when this curvature occurs in the mid- back region, the ribs compress on the concave side of the spine and spread apart on the convex side (Figure 1). On the concave side, the attached ribs are pushed sideways and forward, while on the convex side, they collapse toward the spine and move back, thus forming the characteristic rotation of the rib cage. The ribs on the convex side often protrude posteriorly, and over this protrusion there frequently develops a tense, painful mass of muscle tissue.
FOUR MAJOR SCOLIOSIS CURVES
Curvature can take place anywhere in the spinal column but generally follows four common patterns. In a right thoracic scoliosis (Figure 2) , the major scoliosis is concentrated in the thoracic (mid-back) region, and the spine curves to the right. (There may also be a counter curve to the left in the lumbar region, but this curve is less severe.) In a left lumbar scoliosis (Figure 3), the major curve is to the left and is concentrated in the lumbar (lower back) region, though, as shown in the diagram, there may be a less extreme counter curve to the right in the thoracic region. A third type of scoliosis is the right thoraco- lumbar (Figure 4) , where the major curve is to the right in the thoracic and lumbar region. The last type of curvature (Figure 5) is the right thoracic-left lumbar combined curve, where the major curve is to the right in the thoracic region, with an equal counter curve to the left in the lumbar region. For unknown reasons, 90 percent of thoracic and double curves are right convexity (curve to the right); 80 percent of the thoraco-lumbar curves also are right convexity; and 70 percent of the lumbar curves are left convexity. Seven times as many women as men have scoliosis.
STRUCTURAL AND FUNCTIONAL SCOLIOSIS
Scoliosis can be either structural or functional. The structural variety is much more serious and develops as a result of unequal growth of the two sides of the vertebral bodies. It usually appears during adolescence, and its causes are not well understood – approximately 70 percent of all structural scoliosis are idiopathic, meaning doctors do not know why they develop. Functional scoliosis only affects the back muscles and does not structurally alter the body. It can result from such things as poor posture or repeated unbalanced activity, such as always carrying books on one side. It is much more common than structural scoliosis, usually much less noticeable since the degree of curvature is less, and almost always reversible.
To determine whether a scoliosis is functional or structural, bend forward from the hips. If a lateral (side to side) curve visible in standing disappears in this position, the scoliosis is functional; if the curve remains, it is built into the ribs and spine, and the scoliosis is structural.
YOGA OR SURGERY?
When I was 15, my family physician informed me that I had a severe structural right thoracic scoliosis. He recommended a brace and threatened me with a possible fusion of the spine, an operation in which metal rods are inserted next to the spinal column to prevent the curvature from growing worse. Appalled, I consulted a top orthopedic surgeon, who suggested that instead I try a regimen of exercise and stretching.
I exercised regularly throughout high school and college, but although 1 experienced little discomfort, I noticed that my posture was becoming worse. I was rounding my shoulders, particularly on the right side; and when I wore a bathing suit, I noticed that the right side of my back protruded more than the left. After graduation, while working with the Peace Corps in Brazil, I began to experience spasms and acute pain in my back. Guided by a fellow Peace Corps volunteer, I turned to hatha yoga.
When I stretched in the yoga poses, the numbness on the right side of my, back went away, and the pain started to dissolve. To explore this path further, I returned to the United States, where I studied at the Integral Yoga Institute with Swami Satchidananda and learned about the importance of love, service, and balance in life and yoga practice. Then I turned to the Iyengar system to explore in depth the way the therapeutic use of yoga postures could help my scoliosis.
Since that time, I have been exploring and healing my body through the practice of yoga. By teaching students with scoliosis, I have learned how to assist others with their own explorations. I have found that although every scoliosis is different, there are certain philosophical guidelines and practical yoga postures that can be helpful to yoga students with scoliosis.
The decision to do yoga to remediate a scoliosis entails a lifetime commitment to a process of self-discovery and growth. For many people, this kind of commitment is intimidating. It’s tempting to turn instead to an orthopedic surgeon, who will “fix” a back by fusing it and get rid of the pain forever. Unfortunately, this operation results in a virtually immobile spine and frequently fails to alleviate the pain. I taught one teenage student with an extreme scoliosis who, weary of struggling with her yoga practice, gave up and had her back fused. To her dismay, her pain persisted, and she had even less mobility than before. When the rod in her back broke, she had it removed rather than replaced, and she returned to her yoga practice with a renewed and deeper commitment.
Choosing the path of self-discovery rather than surgery requires not only commitment but inner awareness. Guidance from a competent teacher is helpful, but awareness of our own bodies is crucial – no famous guru can fix our backs for us, any more than an orthopedic surgeon can. Only through our own constant awareness and loving attention can we transform our discomfort into a guide that helps us to get in touch with our bodies.
The goal of yoga practice should not be to straighten our backs; we must learn to accept them as they are, not deny them or judge them. Instead, we must work to understand our backs and to relate to them with sensitivity and awareness. Healing is much more than straightening a scoliosis, or curing a disease. It is learning to love and nurture ourselves and trust our inner knowing to guide us to a vibrant state of being.
YOGA FOR SCOLIOSIS
When the body is balanced and aligned with gravity, a yoga posture will be almost effortless. Before doing yoga, my body did not know what “balanced” felt like. Through yoga, I have learned that I can have a curved spine and still be balanced and graceful.
There are six major areas of the body to focus on while doing the yoga poses for scoliosis. These areas are very important in creating proper alignment, decreasing pain. and minimizing further curvature of the spine.
1. Feet and Iegs. When standing and walking, it is very important to place equal weight on both feet and to be aware of any imbalances. Strengthening the legs creates a solid foundation from which the spine can stretch and become freer, and it enables the legs, rather than the spine, to carry the weight of the body.
2. Spine. Since this is where the scoliosis is located, it is important to focus on lengthening the spine, which tends to reduce the S curve.
3. Psoas (Major and Minor). These two muscles (a pair on each side of the body) are the principal flexors of the thigh. They arise from the iliacus muscle and along the vertebral column and join to insert on the lesser trochanter of the femur (Figure 6). Together with the iliacus, they form a structural and functional unit called the iliopsoas. Besides flexing the thigh, the iliopsoas is an important postural muscle. During sit ting it balances the torso; in standing it counteracts the tendency of the torso to fall behind the line of gravity, which passes just in back of the hip joints. Keeping this muscle well toned aligns the lower limbs with the torso and frees the spine.
4. Scapula. To prevent the upper back from rounding (a common problem in people with scoliosis) , it is important to drop the shoulder blades down from the ears and draw them in toward the front of the body. To facilitate this movement, we must develop increased flexibility of the muscles surrounding the shoulder blades.
5. Abdominal Muscles. To strengthen the abdominal muscles is very important with a scoliosis. If the abdominals are weak, then it causes the back muscles to overwork and therefore tighten. In extreme cases, it may cause lordosis or an extreme curve of the lower back particularly on the concave side of the lower back.
6. Breath. Awareness of the breath is perhaps the most important thing to focus on while doing the yoga poses. Usually very little air enters the lung on the concave side of the spine.’ Sending the breath into the collapsed rib cage on this side can actually stretch the intercostal muscles and create more lung capacity. This creates more openness and evenness on both sides of the chest, from the inside out.
YOGA POSES FOR LENGTHENING THE SPINE
When beginning to practice yoga, the most important movement is lengthening the spine. This movement will create more evenness in the spine and ribs and release tension in the muscles of the back.
Cat/Cow Pose. At the start of a practice period, loosening the spine with the breath is important to prevent injury, particularly at the apex of the scoliosis. Kneel with the hands below the shoulders and the knees below the hips. Inhaling, lift the head and tailbone, making the lower back concave. Exhale and tuck the tailbone, rounding the back and releasing the neck (Figure 7) . Repeat at least 10 times.
Vajrasana (Child’s Pose). After completing the exhalation in
the Cat/Cow Pose, stretch the hands out in front. Inhale deeply into the back, particularly the concave side where the ribs are compressed. Exhale and move the buttocks back halfway toward the heels. Inhale, and stretch the arms and the pelvis away from each other, with the upper back following the arms and the lower back following the pelvis (Figure 8). Breathe into this position, feeling the intercostal muscles stretching between the ribs and the spine and back muscles lengthening. To help stretch the compressed ribs on the concave side, move the arms toward the convex side, keeping the arms shoulder-width apart. Notice how this movement makes the back more even (Figure 9). Mter breathing into this position for a minute, move the buttocks all the way back to the heels and relax the arms by your side. Relax the entire body.
Three-Part Bar Stretch. This pose may be done at a dance bar or at home on a porch railing, sink, or wherever you can grab onto something and pull.
Grab onto the bar with hands shoulder-distance apart and walk the feet back until the spine is parallel to the floor and the feet are directly under the hips. Now bring the heels forward to the position where the toes were and hang backwards, bending from the hips and stretching the buttocks away from the bar (Figure 1 0). Keep the neck in line with the spine, not allowing the chin to lift up. Feel the entire spine being lengthened by the pull.
Bring the feet in a few inches toward the bar and bend the knees into a right angle, with the thighs parallel to the floor and the knees directly above the heels. Continue to stretch the buttocks down and backwards. This particularly stretches the mid-back below and to the sides of the shoulder blades.
Walk the feet forward a few inches farther to allow the heels to remain on the floor. Let the buttocks move down toward the floor in a squat. Now pull back, keeping the buttocks down, and feel the lower spine being stretched.
STANDING POSES
Trikonasana (Triangle Pose). In Triangle Pose, the feet are separated while the torso stretches to the side. Because of the scoliosis, your emphasis should be different when you stretch to each side. When stretching toward the side of the concavity, emphasize lengthening the spine to open up the compressed ribs on the underside of the body and decrease the protrusion of the ribs on the opposite side. When stretching to the convex side, emphasize twisting to create more evenness on the sides of the back.
For example, someone with a right thoracic scoliosis would stretch to the left to create length in the spine. Separate the feet about one leg’s length. Turn the left toes out to 90 degrees and the right toes in to 45 degrees, and stretch the torso to the left, bending from the hips and stretching the arms away from each other. Placing your left hand on the back of a chair helps to spread out the ribs on the concave side. Drop the right ribs in medially towards the spine so both sides of the body are parallel to the floor. Notice how dropping the right ribs spreads out the compressed left ribs (Figures 11 [incorrect] and 12). You can also press the right outer heel of the foot into a wall to give stability and strength from which to stretch. If you are practicing in a studio that has wall ropes, a rope attached to the wall and wrapped around the right thigh is an excellent way to create this stability, particularly for someone with a lumbar scoliosis.
It is also important to stretch to the opposite side to decrease the bulge in the back on the convex side of the spine. Place the left outer heel at the wall or use a rope attached around the left leg. Lengthen out from the hip as you did on the left side. Place the right hand on the leg and bring the left heel of the hand to the sacrum. Inhale and draw the base of the right shoulder blade down from the ears and into the body, opening the chest. Exhale and twist from the navel, drawing the left elbow back to align the shoulders with each other (Figure 13). Let the neck and head follow.
Virabhadrasana I (Warrior Pose). This pose strengthens and stretches the legs, psoas, and back muscles. For students with scoliosis, this pose is best practiced with the support of a doorjamb or pillar, to keep the torso upright and balanced. Bring the back groin to the edge of the door jamb with the front heel about two feet ahead and the front leg hugging the side of the wall. Place the back toes about two feet behind the left hip. Square the two hips so they are parallel to each other and point the tailbone to the floor, lengthening the sacrum.
Inhale and bring the arms overhead parallel to the shoulders, palms facing toward each other, and lift from the upper back, lengthening the ribs and spine out of the pelvis. Exhale and bend the right leg, creating a right angle, with the thigh parallel to the floor and the shinbone perpendicular to the floor (Figure 1 4). The right knee should be directly over the right heel, with the left leg fully extended and the left heel descending to the floor. Keep lifting the spine and at the same time press into the floor with the back leg. If you have difficulty bringing the back heel to the floor, place a sandbag under the heel for balance. Pressing it back and down to the floor helps to penetrate the deep psoas muscle.
For additional standing poses helpful for scoliosis, consult B.K.S. Iyengar’s Light on Yoga (Shocken Books, 1971). Utthita Parsvakonasana (Lateral Angle Pose) , Ardha Chandrasana (Half Moon Pose), Parighasana (Cross Beam of a Gate Pose) are three excellent lateral stretches to do for scoliosis that follow the same guidelines as Trikonasana. Parivrtta Trikonasana (Revolved Triangle Pose) , and Parivrtta Parsvakonasana (Revolved Lateral Angle Pose), two twisting standing poses, are highly recommended for intermediate yoga students.
INVERSIONS
Even in a healthy spine, the continual pull of gravity can compress the intervertebral disc and eventually cause nerve damage or disc herniation. In a spine with scoliosis, the problem is even more pronounced. The person will tend to feel the uneven pressure of gravity constantly but have no understanding of how to create alignment to alleviate it. Inversions create a freedom in your body to experience alignment without the usual distortions caused by gravity. As a result, it is often easier, particularly if you have a scoliosis, to feel what alignment is upside down than while standing on your feet. The inversions also develop strength in the back and arms; increase circulation to the vertebrae, brain, and other organs, and encourage Iymphatic circulation and venous blood return.
Ardha Adho Mukha Vrksasana (Half Handstand). Handstand is generally one of the first inversions students learn. It helps to develop arm and shoulder strength, preparing you for other inversions such as Headstand. By learning to lift up in Hand stand, you also learn to lengthen the spine against gravitational force, a movement that is particularly important for those with scoliosis. If you are new to Handstand and afraid to try it, Ardha Adho Mukha Vrksasana (Half Handstand) is an alternative that can help you build your confidence and strength. To warm up, do Adho Mukha Svanasana (Downward-Facing Dog Pose) with the heels at the wall. Lift the right leg and extend through the heel with the ball of the foot pressing against the wall (Figure 15). Reverse, bringing the right leg down and lifting the left leg. This movement helps build upper body strength, often lacking in practitioners with scoliosis; it also teaches you to lengthen both sides of the body evenly, despite the distortion in your spine.
Rest in Child’s Pose. Now go back into Adho Mukha Svanasana and lift both legs onto the wall, hip-width apart and parallel to one another. The feet should be at hip level, no higher, and the arms, shoulders, and torso should be in a straight line (Figure 16). Press actively into the wall with the heels. Spread the shoulder blades away from each other and draw them away from the ears. Press into the inner hands, draw the elbows in and keep the arms straight. If this is difficult, use belt around the arms, just above the elbows.
Salamba Sarvangasana (Shoulderstand). Shoulderstand releases the chronic tension in the neck and shoulders so common among people with scoliosis. If you are a beginner, you should have as much support as possible to encourage the chest to open and to prevent the weight of the body from descending on the neck and shoulders. Begin by using a chair, a bolster, and the wall. Place the back of your chair approximately one foot from the wall. Place a nonslip mat and thin blanket on the seat of the chair and a blanket over the back. Place a bolster or several blankets on the floor in front of the chair. If you are on a wooden floor, place a folded towel in front of the blankets for placing under your head. Sit in the chair facing the wall and roll backwards into the pose, bringing the shoulders onto the bolster and head on the floor. Hold on to the chair’s back legs and lift your legs, resting your feet against the wall (Figure 17). If your chin is higher than your forehead, place a folded towel under your head. Relax the eyes, turning them inward and down toward the chest. Stay in the pose for 5 to 10 minutes. To come out of the pose, slide the chair away and lower your but tocks to the floor.
As you progress, begin to do Shoulderstand at the wall with out the chair and bolster. Place four folded blankets at the wall; lie on the blankets with the buttocks close to the wall, the shoulders at the edge of the blankets, and the legs stretched up the wall. Bend the knees, lift the buttocks, and shift your weight onto the shoulders. Interlace the fingers with the elbows straight and roll the shoulders under. Support the back with the hands and lift up through the knees. Straighten one leg at a time, until you are strong enough to straighten both legs and balance (Figure 18). If you get tired, stretch the legs back to the wall, keeping the legs straight. Hold for a minute in the beginning and gradually increase to 5 to 10 minutes. To come out, release the hands from the back, and continue to extend through the heels as you slide to the floor, pressing the tailbone toward the wall.
As your practice progresses, you might wish to try Pincha Mayurasana (Forearm Balance). When the arms, shoulders,and back have been strengthened through regular inversion practice, you may be ready to practice Salamba Sirsasana (Headstand).
BACKBENDING POSES
The backward bends have been the most powerful poses in releasing my back tension and armoring. Backbending has given me freedom and mobility, particularly on the more developed right (convex) side of my back.
Passive Backbend Over a Bolster. With a scoliosis you may experience periodic muscle spasms. Thus, even though backward bends are helpful, you should approach them with softness rather than force. In order to open up, the muscles in the back must learn to release rather than tighten, allowing the heart to open like a lotus blossom from the inside out. Beginning with passive backbends encourages this approach.
Roll a firm blanket into a cylinder or use a bolster. Lie back on the folded blanket or bolster so that your shoulder blades are resting on the roll. Your head and shoulders should rest on the floor. Stretch the legs out through the heels to prevent lower back compression, and lift the breastbone. Bring the chin down toward the chest and lengthen the neck. Now extend the arms straight overhead and rest them on the floor, if possible (Figure 19). Feel the breath evenly expanding the rib cage. Try to breathe into and expand the compressed side of the rib cage. If you feel the convex side of the back protruding onto the roll more than the concave side, place a small hand towel or tie under the concave side so that the back touches the blanket evenly. You may also do this passive backbend over the edge of your bed.
Salabhasana (Locust Pose). This backbend is very important for scoliosis, because it strengthens the erector spinae muscles and the hamstring muscles of the legs. This strengthening helps to ensure adequate support of the spinal column in all back bending poses.
Lie face down and extend the arms out to the side, in line with the shoulders. On an exhalation, lift the head and upper chest off the floor, keeping the buttocks firm and pressing the thighs strongly down. Lengthen the arms out to the side so the shoulder blades stretch away from the spine, keeping the hands below the level of the shoulder blades. Exhale as you
release. Repeat three to five times.
Now stretch the arms overhead and feel the muscles of the back lengthening from the pelvis. Lift the arms and place the palms on the seat of a chair in front of you. Stretch the arms out once again and move the chair farther away to lengthen the spine. Gently lift the abdomen and floating ribs to support the front of the spine. Press down strongly with the palms on the chair as you press the thighs downward and lift the spine further (Figure 20) . Exhale as you release. Repeat three to five times. You may also do this pose with the legs lifted as well as the arms.
As you become more advanced, you may wish to attempt more advanced backbends, such as Dhanurasana (Bow Pose), Ustrasana (Camel Pose), and Urdhva Dhanurasana (Upward Facing Bow Pose) .
TWISTS
Twists are very important for scoliosis because they help to derotate the spine. Caution should always be taken to lengthen the spine before twisting. Chair Twist. Sit on a chair with your right side to the back of the chair and your hands placed on each side of the back of the chair. Place your feet firmly on the floor, knees and ankles together. With an inhalation, lengthen the spine; with the exhalation, gently rotate from the navel, stretching the ribs away form the pelvis (Figure 21). Press with the right hand into the back of the chair to create more twist, and with the left fingers pull on the back of the chair, drawing the left shoulder blade away from the spine. Continue to breathe into the pose and twist further with each exhalation. With an exhalation, slowly release the pose. For a right thoracic scoliosis, emphasis should be put on twisting in this direction. Twist both ways twice, but stay longer on this side.
As you progress you will be able to add several other seated twists that are beneficial to scoliosis, including Blharadvajasana, Maricehyasana, and Ardha Matsyendrasana.
FORWARD BENDS
Forward bends help you release deep tension in the back and shoulders. The longer you can stay in these poses, the deeper will be the release.
Janu Sirsasana (Head to Knee Pose). Sit at the very edge of a folded blanket with both legs straight, and pull the flesh of the buttocks away from the sitting bones. Bend your right knee and bring your right heel into the right groin, letting the knee fall gently to the side. Bend forward from the hips over the left leg. In this forward bend, first lift the spine and draw the shoulder blades down and into the back, opening the chest. This movement counter acts the tendency of people with scoliosis to hunch their backs and round their shoulders. To achieve this opening of the chest, you may pull gently on a chair, or on a tie wrapped around the ball of the left foot. Place a sandbag on the protruding (convex) side of the spine. (Figure 22). If you can come farther forward, place a bolster or blanket across the straight leg and rest the forehead on the bolster. Repeat on the opposite side.
Paschimottanasana (Seated Forward Bend) and other seated forward bends can also be practiced in a similar fashion, with the aid of a chair, a sandbag, and a bolster.
Savasana (Corps Pose) with Breathing Awareness
Relaxation is crucial to allow the body, mind, and sprit to receive the fruits of the practice. Especially for scoliosis sufferers, relaxation is difficult, for the muscles have been clenched to support the uneven spine. Lie down on your back on the floor, stretching both sides of the body evenly. If the back is uneven due to the scoliosis, place a tie or small towel in the concavity of the back. Close your eyes and breath deeply, becoming especially aware of the spine and expanding both sides of the rib cage evenly. Move your awareness through your body, noticing and releasing any areas of tension. Stay in the pose at least 10 minutes.
As the body relaxes in Savasana, the mind becomes quiet, and true healing can take place. Healing is not just a physical activity, but involves deep awareness of the mind and sprit as well. In the course of out lives we encounter many hardships that, like our curved spines, may initially appear to be painful handicaps. In learning to take responsibility for healing our backs and to treat them with awareness and sensitivity, we also learn to respond this way to other emotional, mental, and physical traumas. Through yoga, we discover that the curved spine has a wisdom all its own. Its greatest power is its ability to teach us to live our lives with sensitivity, balance, and grace.
Elise Browning Miller
Resource: B.K.S. Iyengar’s Light on Yoga is available through our bookstore.
