From an article, Yoga for Scoliosis, by Elise Browning Miller which originally appeared in The Spinal Connection the news letter of the National Scoliosis Foundation, Spring/Summer 1997.
What is Yoga
Yoga, meaning yoke or union is and ancient physical, mental and spiritual practice designed to cultivate inner peace, an open heart, a calm mind, and a strong relaxed body. In the West, yoga is most commonly associated with the physical discipline known as hatha yoga, one of several branches of yoga.
The roots of yoga go back over 3.000 years to India and was first introduced into the United States in 1893. Today, an estimates 5 million Americans practice yoga and the number is rapidly growing.
Hatha yoga is the practice of physical postures (asanas), the practice of breathing techniques (pranayama) and relaxation (sivasana), and was developed to relax, detoxify, strengthen and stretch the body. Within hatha yoga there are many different schools, such as Iyengar, Kripalu, Ashtanga, and Viniyoga. Iyengar yoga, named after its founder B.K.S. Iyengar, is renowned for its precise attention to alignment, and anatomical detail. Individual attention is given to special physical problems such as scoliosis.
Yoga for Scoliosis
In the practice of doing the yoga postures, there is an emphasis on postural alignment, particularly in the Iyengar system. One becomes more aware of imbalances throughout the body and learns methods of improving one’s posture. For someone with scoliosis it is is very important to both lengthen ad strengthen the muscles that support the spine in order to relieve tightness and pain. There are many postures where the spine is simultaneously being lengthened and the paraspinal muscles (longitudinal muscles sown the spine) and other supporting muscles of the back are strengthened which together help offset further lateral curvature and rotation.
Standing poses strengthen the legs which creates a solid foundation from which the spine can stretch and become freer. This enables the legs, rather then the spine, to carry the weigh of the body.
At the same time, it is very important to create flexibility in the legs and mobility, particularly, in the hips. There are many yoga postures that stretch the hamstrings, hip flexors, and quadriceps which are the key muscles that not only create more mobility and strength but which can help improve posture.
Many yoga postures also loosen the the upper back particularly the trapezius muscle (large muscle from neck to base of shoulder blade).
Yoga also emphasizes breath awareness while doing the postures. With scoliosis, there is often decreased breathing capacity particularly on the concave side, because the intercostal muscles (muscles between the ribs) have decreased in their elasticity and strength. By sending the breath into a collapsed ribcage on concave side, one can actually stretch the intercostal muscles and create more lung capacity as will as more evenness of the sides of the body.
Suggested Yoga Poses for Scoliosis
Please Note:
We encourage all readers treated for scoliosis to advise their physician about there intent to use yoga. We caution all readers to remain within their limits and adhere to the advise of their doctors.
Yoga may be good for general health and will being, and help manage the affects of scoliosis. There is no known scientific evidence however to show that yoga corrects of halts abnormal spinal curvatures.
Suggested Yoga Poses
The following are beginning yoga poses that you can do on your own. As you progress it is recommended that you receive the guidance of a yoga teacher to assist you in learning more advance poses so they can give you guidance of proper alignment for your scoliosis. Please remember to breath while holding these poses. You may start to hold these poses for a half a minute and build up to minute.
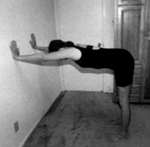 1. Right Angled Wall Stretch
Place hands on the wall shoulder width apart at shoulder level and walk the feet back placing them hip width apart under the hips. Push palms into the wall and lengthen spine. Keep lower back in. As the shoulders become more flexible, you can bring the hands to hip level to form a true right angle.
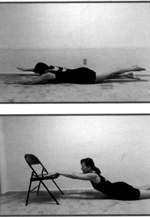
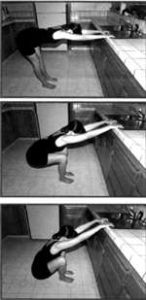 2. Three Part Pull
a) Pull back form kitchen sink, railing or ropes. Feet are in towards sink and legs are straight.
b) Walk feet forward so when you bend knees, legs are are at a right angle as if sitting in a chair. Pull back.
c) Walk feet in a few inches. Drop buttock to a squat and pull back.
(May also do with a partner)
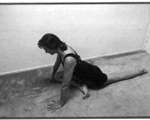
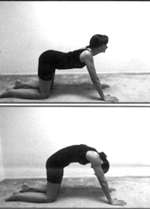 3. Pelvic Tilts Pose
a) Dog Tilt: Tailbone, sitting bones lift. Lower back in. Head lifts. Inhale.
b) Cat Tilt: Tailbone, sitting bones down. As palms press down, lift mid back bringing navel to lower back and spread shoulder blades. Head drops and neck releases. Bring concave side of back up to ceiling more to even the sides. Exhale.
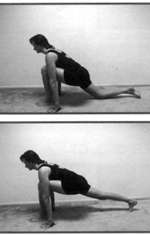
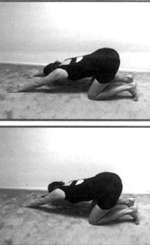 4. Extended Puppy Pose
Stretch the hands out in front. Move the buttock halfway back to the heels and press down through the hands as you pull back trough the hips. Move hands toward convexity if extreme lateral curve and feel ribs and spine cone towards the center. (i.e. move hands to right if you have thoracic scoliosis)
 5. Lunges
Bring left foot forward and back knee down. Lunge forward so front knee is slightly over ankle bone. Feel stretch in back thigh and groin. Variation – Bring back knee off and stretch through heel. Reverse.
 6. Hip Opener
Come back on all fours. Bring right foot and knee forward and place on floor. Square hips and slide left leg back. Slowly come down with hands out in front. If you come far enough, place elbows on floor. Reverse.
 7. Back Strengthener
a) On tummy, arms out in front. Lift right arm and left leg. Stretch, take five breaths holding the position. Reverse and repeat again on each side.
b) Place hands on a low ledge at least 8 inches from floor or seat of a chair if shoulders are flexible. Press down through palms as you lift up through crown of head. Breathe. Repeat second time.
 8. Hamstring Stretch
Bend right knee to chest and place belt or strap around ball of foot. Slowly straighten leg and stretch through heel. Reverse.
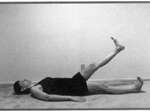 9. Abdominal Strengthener
Legs on floor. Bring right leg up to 90 degrees slowly bring down to 60, 30 a few inches form the floor and relax. Reverse legs. Do both legs together as you get stronger. Arms down by side or overhead as you get stronger.
 10. Gentle Twist
On floor, bend right knee and place on left thigh, move onto side left hi and twist left knee over towards floor as you simultaneously look to right and keep right shoulder down. Reverse.
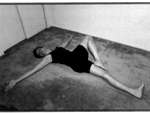
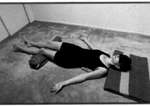 11. Relaxation
Place a hand towel or washcloth under concave side of back as you lie evenly on floor. Lie on back with blanket under head and knees. Align your body and let go of all tightness in your body from head to toes. It is advisable to stay in the relaxation position for at least 5 minutes letting go of all tension.
